Across the board, finished basements are one of the best ways to add livable space to your home without breaking the bank. In fact, on average, they cost one-third to half as much as a similarly sized aboveground addition!
However, if your standard lot home wasn’t built with downstairs living in mind, the only way out of the basement is a stairwell to the ground level, usually leading to the kitchen (or a hallway just off it), where most fires start. In an emergency, you would then be trapped in the basement.
This is why most building codes require a basement egress door or window — an integral part of the egress system — for emergency exit and first responder access.
Basement Egress Window System Components
A complete basement egress window system includes several critical components:
- An egress window large enough for residents and first responders to easily fit through.
- A single-hung egress window consists of a single sash that slides up and down. Double-hung egress windows add a second operable sash.
- Casement egress windows swing inward like a door
- Sliding egress windows slide back and forth along a track.
- Some egress windows are hybrids of the above, such as Astro egress windows (single-hung + casement) and tilt-and-turn windows (tilt inward like a traditional basement hopper window for partial venting and also operate as an in-swinging casement egress window)
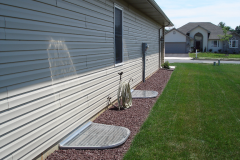
- An egress window well dug to the depth of the window. The window must operate so that it doesn’t obstruct the egress window well (i.e. it can’t swing outward).
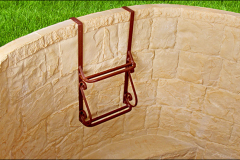
- An egress ladder or egress window steps attached to or built into the side of the window well.
- A grate and cover to prevent water and debris from collecting in the bottom of the egress window well, plus insurance against people or animals falling into the well.
Basement Egress System Advantages
Beyond potentially saving lives in the event of an emergency, a basement egress window system offers several other benefits.
- Enhanced natural light and ventilation compared to small basement hopper windows.
- Improved aesthetics — window well manufacturers have designed and refined products that seamlessly integrate with surrounding landscaping.
- Increased enjoyment of your finished basement for work or play, thanks to your egress system’s features.
Basement Egress Window Requirements
Most states’ egress window requirements are derived from the International Residential Code (IRC), which lays out safety standards for single and multi-family homes.
The minimum size of a basement egress window allowable is 5.7 square feet — it can be a minimum of 24” in height or 20” in width. Still, those dimensions multiplied together must total 5.7 square feet (versus an above-ground egress window, whose minimum clear opening area must only total 5.0 square feet).
There is no set number of egress windows required in a basement, but there must be one:
- In any bedroom or sleeping area.
- In any rec room, office, or home theater, should they NOT adjoin with a bedroom.
- If multiple rooms in Category 2 adjoin, only one needs an egress window (or door).
Code requires an egress window well be dug for egress windows below ground level. The area at the bottom of the well must equate to 9 square feet, and there must be 36” of clearance between the egress window and the back of the well. Wells deeper than 44” must have ladders or egress window steps attached, and well covers and grates must open or lift from the inside without the assistance of tools.
Complete Egress Solutions
Egress Solutions offers complete egress window systems for use in below-grade remodeling or new construction. We are a distributor for several major manufacturers, including Boman-Kemp, Bilco, and Rockwell basement egress window systems. Our team uses the industry’s top products for our clients, resulting in the best security and safety for your basement egress system.
Our warehouse in Mullica Hill, New Jersey is centrally located to ensure we can deliver a variety of sizes and systems to your location, or the work area as needed. We proudly serve New Jersey, Delaware, Southern New York, and Eastern and Central Pennsylvania.
The Egress Window Well Installation Process
Installing an egress window well is a significant home improvement project that enhances safety and potentially adds living space to your basement. Here’s a comprehensive walkthrough of the process:
Phase 1: Planning and Preparation
- Review of project needs. We’ll consider:
- Local building codes for egress windows
- Location of utilities and septic systems serving your home
- Your neighbors and property lines
- Layout of your basement
- Selection of egress window(s) and window well(s) style and materials
- Email proposal for signature and approval
- Initial downpayment and scheduling of work.
Phase 2: Excavation and Structural Work
- Excavating the Window Well
- Dig the well area 12-18 inches wider than the window on each side
- Excavate to proper depth (typically 12-18 inches below window sill)
- Slope excavation away from foundation for drainage
- Compact soil and check for proper grading
- Creating the Window Opening
- Mark foundation wall to measurements of window
- Make scratch cut with a dry saw
- Hook up water and begin to make real cut
- Utilize a saw that can plunge cut through entire thickness of the wall from the exterior
- Final Preparations
- Remove concrete/masonry debris
- Check masonry opening height and width
- Install pressure-treated lumber for rough opening
- Dry fit window to confirm accuracy
Phase 3: Window Well Installation
- Installing the Window Frame
- Apply weatherproof membrane around opening
- Set window frame in opening with proper shimming
- Ensure window is level, plumb, and square
- Secure frame to opening with bolts/screws and spray foam
- Ensure any unevenness or voids are filled and sealed to avoid air and water infiltration.
- Set the Well
- Mark where well will start (3 or 4 inches above grade)
- Drill into foundation and put an anchor through the well
- Lower the well into the hole, making sure well is centered on the wall
- Bolt top of well to anchor point
- Make sure well is plumb
- Caulk where foundation meets the well
- Install Accessories
- Escape ladder: Needed when there is more than 44” between bottom and top of well; hangs on side
- Safety grate: Slides on top of well to prevent accidental fall-ins
- Safety cover: Fits on top of well to deflect leaves, debris, and precipitation
- Install Window Sash and Hardware
- Install window sash and verify smooth operation
- Add all hardware including locks and emergency release mechanisms
- Test opening and closing multiple times
- Install window screens
Phase 4: Waterproofing and Finishing
- Install Drainage System
- Lay drainage pipe connected to foundation drain or sump pump
- Add 4-6 inches of gravel for drainage base
- Install drain tile around well perimeter if required
- Ensure proper slope of drain pipe toward drainage system
- Backfill and Grade
- Backfill around well with appropriate materials
- Create proper slope away from foundation (minimum 6 inches over 10 feet)
- Compact backfill in lifts to prevent settling
- Install final grading and landscaping
- Interior Finishing
- Install interior window trim and sill
- Replace insulation and vapor barrier
- Reinstall or install new interior wall coverings
- Paint or finish as desired
Egress Solutions, Inc is a distributor for several major manufacturers including Boman-Kemp, Bilco and Rockwell basement egress window systems.
Our new warehouse in Mullica Hill, New Jersey is centrally located to make sure we can deliver a variety of sizes and systems to your location, or to the work area as needed.


